Can You Air-Condition a Dog House? (How to Build One)
Yes — you can air-condition a dog house. The trick is to insulate first, then fit a small 5,000 BTU window unit (or a battery micro-AC) into a custom-cut rear panel. Here’s the full build.
Can you air-condition a dog house? Absolutely — and you don’t need a kennel-sized mini-split to do it. The reliable way to air condition a dog house is to insulate the shell, cut a sealed opening in the rear wall, and drop in a small 5,000 BTU window AC or a portable battery micro-AC. The catch most DIY guides skip: an air conditioner struggles and wastes energy in an uninsulated box, so insulation isn’t optional — it’s the part that makes the AC actually work. This guide walks the whole build, from sizing the unit to sealing the gaps.
Can you air-condition a dog house? (the honest answer)
Yes. A dog house is just a tiny room, and the same physics that cool a bedroom cool a kennel — only the box is far smaller, so even the weakest AC on the market is usually more than enough. The real question isn’t can you, it’s how to do it without the unit short-cycling, freezing up, or running your power bill into the ground.
Active cooling matters most for at-risk dogs — brachycephalic breeds (Bulldogs, Pugs, Frenchies, Boxers), thick or dark-coated dogs (Huskies, Malamutes), seniors, puppies, and overweight or heart-/airway-compromised dogs. The ASPCA flags dangerous heat above 85°F, and a useful field gauge is the “150 rule”: when air temperature (°F) plus humidity (%) reaches 150 or more, heatstroke risk climbs fast. If your summers cross those thresholds, an air-conditioned dog house is a genuine safety upgrade, not a luxury. For broader heat-safety guidance, the ASPCA’s hot-weather safety tips are the reference we point owners to.
How to air condition a dog house: the step-by-step build
Here’s the full sequence. Do the steps in order — insulation and sealing decide whether the AC sips power or guzzles it.
1. Insulate the shell (walls, roof and floor)
This is the step that makes everything else work. Line the walls, roof and floor with rigid-foam board (XPS or polyiso), cut to fit between the framing, then cover it with thin plywood or paneling so your dog can’t chew it. Even 1 inch of rigid foam dramatically slows heat coming in. Without it, the AC fights the sun through bare walls all day and never catches up — match board thickness (R-value) to how hot your climate runs.
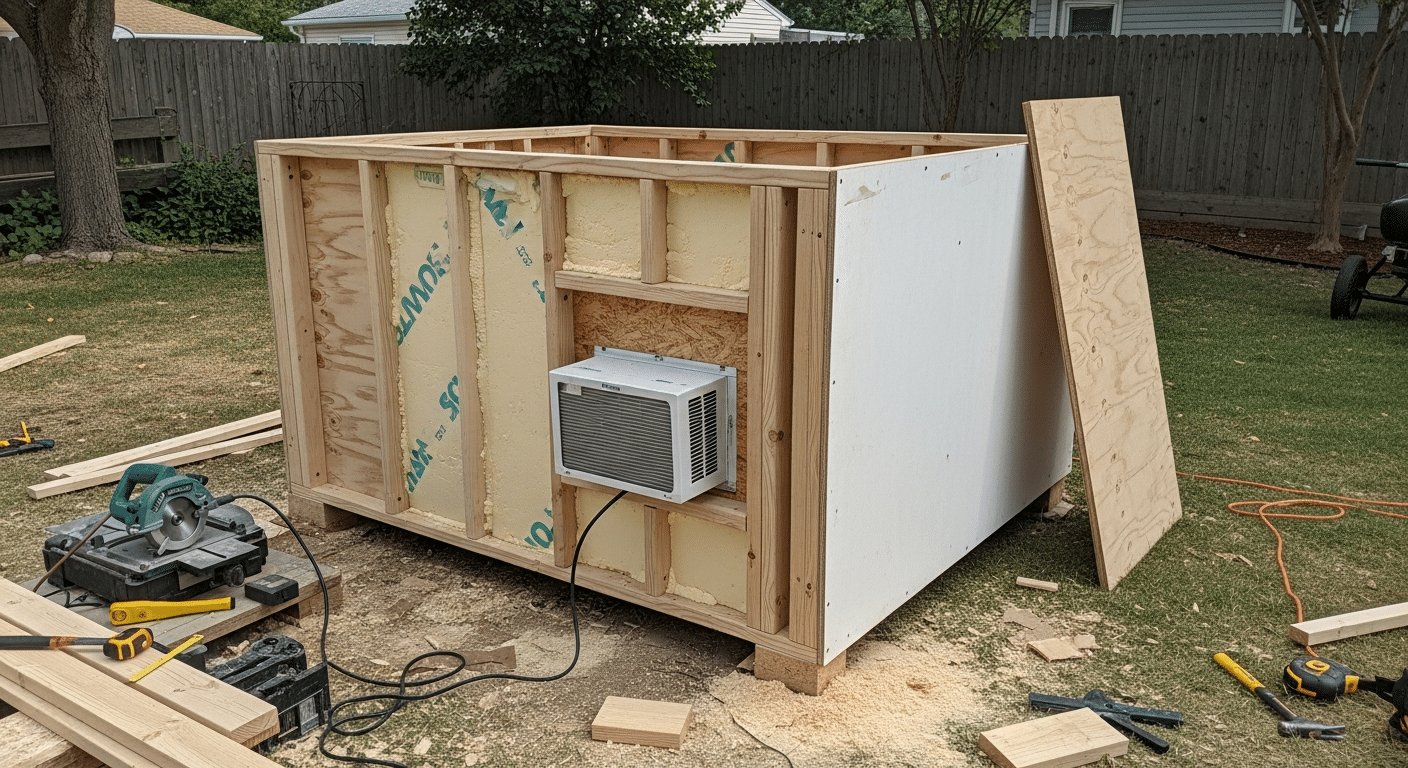
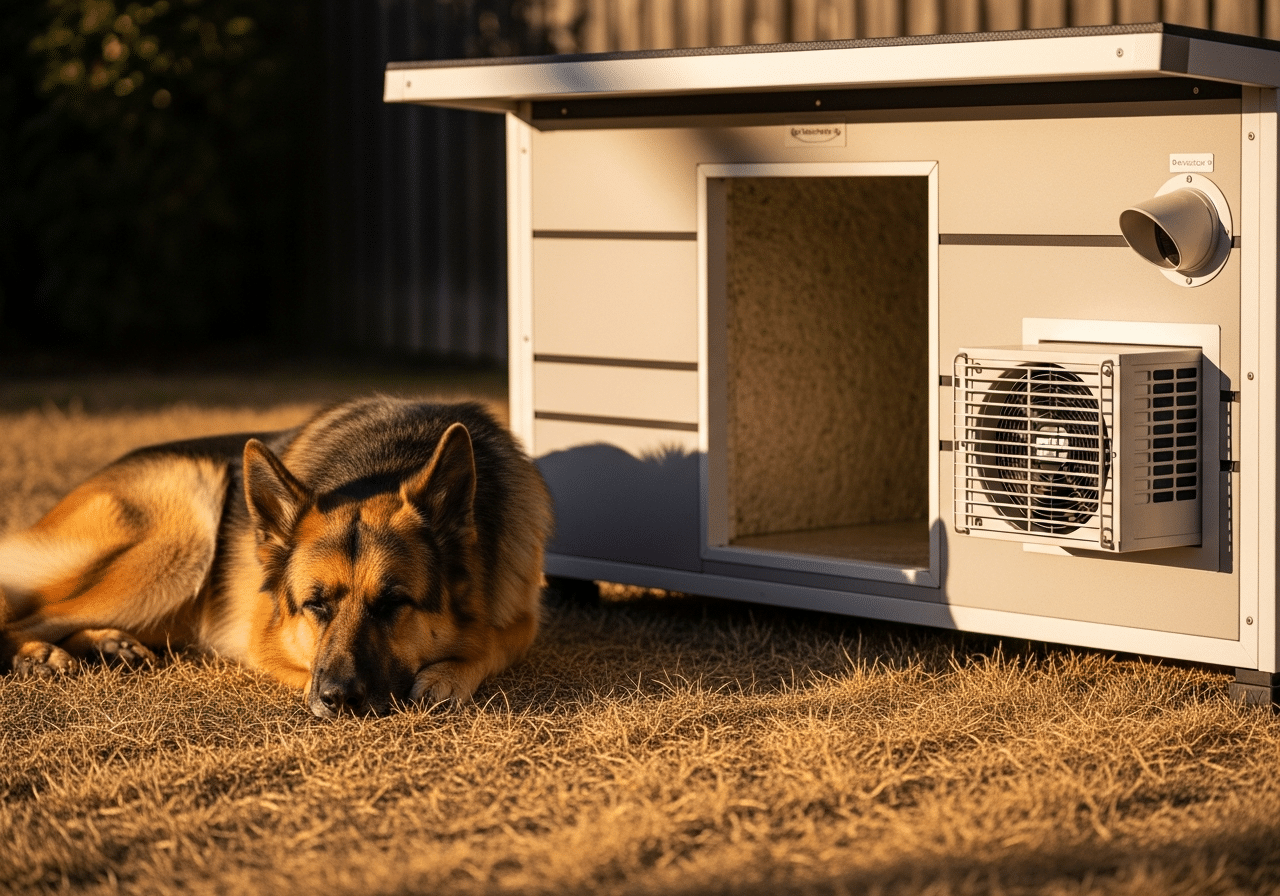
2. Cut and frame the rear panel for the AC
Mark a snug opening for your unit on the rear or side wall (never over the doorway — you want the cold air falling onto the sleeping area, not blowing out the entrance). Cut it slightly undersized, then frame a small wooden “sleeve” so the AC sits in a supported, square hole rather than resting on raw foam. A 5,000 BTU window unit weighs 35–45 lb, so the sleeve needs to carry it.
3. Seat the AC and seal every gap
Drop the unit into the sleeve, tilt it very slightly downward toward the outside so condensate drains away from your dog, and screw it to the frame. Then seal all the way around with weatherstrip foam and exterior-grade caulk or expanding foam. Any unsealed gap is warm air leaking in and cold air leaking out — this is where most DIY builds quietly fail.
4. Fit an insulated, weatherstripped doggie door
Swap the open doorway (or a heavy flap) for an insulated, weatherstripped pet door. An open hole dumps your cold air straight into the yard. A self-closing magnetic or dual-flap door keeps the cooled air inside between visits while still letting your dog come and go.
5. Power it safely
Run the AC on a dedicated outdoor-rated extension cord and a GFCI outlet, keep the cord off the ground and out of chew range (a metal conduit or cord cover helps), and add a simple thermostat or smart plug so the unit cycles instead of running 24/7. For off-grid spots, a battery micro-AC (below) skips the cord entirely.
Sizing the AC: what to put in the wall
A dog house is tiny, so the smallest units on the market are the right call — a bigger AC just short-cycles, never dehumidifies properly, and wastes money. Match the unit to your space and your power situation:
| Option | Capacity | Power | Best for | Watch-outs |
|---|---|---|---|---|
| 5,000 BTU window AC | ~5,000 BTU — cools up to ~150 sq ft (far more than any dog house) | 120V wall outlet / extension cord | The classic DIY choice — cheap, simple, plenty powerful for a kennel | Needs a cord + GFCI; weighs 35–45 lb so frame a sleeve |
| Portable micro-AC (Zero Breeze Mark 3, Coolzy) | ~1,100–2,300 BTU, true compressor | Battery (3–5 hr) or DC/solar | Off-grid yards, travel, no outlet nearby | Pricier; shorter runtime; needs hose venting |
| Spot / evaporative cooler | Varies (adds humidity) | 120V / battery | Hot & dry climates only | Useless in humid air; raises moisture |
| Mini-split (12k–24k BTU) | 12,000+ BTU | 110V/220V hardwired | Large multi-dog kennels/runs | Overkill and overpriced for a single dog house |
For one dog in one insulated house, a 5,000 BTU window unit is the value pick and a battery micro-AC is the off-grid pick. Don’t go bigger — an oversized AC in a sealed, insulated box will blast cold, snap off, and leave the air clammy. If you’d rather buy than build, a portable AC like the Movejoy drops the sizing math entirely.
Mistakes that kill a DIY dog-house AC
- Skipping insulation. The single biggest one — an AC in a bare wooden box never wins against the sun.
- Leaving gaps unsealed. Unsealed edges leak cold air all day; caulk and weatherstrip everything.
- An open doorway. No insulated pet door = you’re air-conditioning the backyard.
- Oversizing the unit. Too much BTU short-cycles, won’t dehumidify, and wastes power.
- Ignoring drainage. Tilt the AC outward so condensate never pools where your dog sleeps.
- Unprotected cords. Chewed cords are a fire and shock risk — conduit and GFCI, always.


